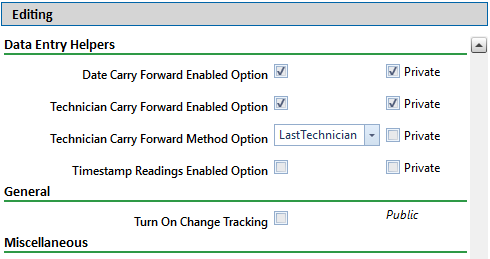
If the Options window is not open, click Tools > Options to open the window.
Click the Editing tab to open the Editing options page.

Check or uncheck the following option's check boxes or select from the drop downs as needed:
-
Date Carry Forward Enabled Option — Check the check box to use the survey date that was last entered as the survey date for the next record when working in an Inspection grid or form.
-
Technician Carry Forward Enabled Option — Check the check box to pre-fill the Technician field (in the Inspection grid) or Repair Technician field (in the Maintenance grid) with a default value when a new record is created. The default value for these fields is determined by the value selected in the Technician Carry Forward Method Option.
-
Technician Carry Forward Method Option — Select a person's name from the drop-down to set the default value for the Technician field (in the Inspection grid) or Repair Technician (in the Maintenance grid). These fields are pre-filled for new records with the default value only when the Technician Carry Forward Enabled Option is checked. The following values are available in the drop-down:
-
Last Technician — Uses the name of the last person entered in the Technician field.
-
Security — Uses the name of the person currently logged into PCS.
-
-
Timestamp Readings Enabled Option — Check the check box to automatically update the timestamp in the Inspection Date field to the current time for new inspections. The Inspection Date is updated once enough survey data is added to mark the inspection as Surveyed only if the inspection has an Inspection Date that matches today's date.
-
Turn On Change Tracking — Check the check box to enable change tracking and keep a history of changes made to records in PCS. The Field and UDF Customizations window allows you to configure which fields' changes are recorded. Refer to Setting Up Change Tracking for Individual Fields.
When change tracking is turned on, the Change History button appears in the data entry grid. For more information about setting up and using Change History, refer to View a Record's Change History.
-
Show Detail Inspection Entry Grid — Check the check box to display the CPDM Test Point Inspection Detail mini-grid.
The Show Detail Inspection Entry Grid check box is not available when using the optional PCS Telluric Compensation feature. The mini-grid displays by default with Telluric Compensation and cannot be disabled.
-
Show Grid Tooltips Option — Check the check box to display a description of the field when you move the mouse over a data entry field.
-
Warn When Below Protection Criteria Enabled Option — Check the check box to display a warning message when an inspection reading is entered that is below the protection criteria value specified in the Test Point Protection Criteria field.
-
Require Remarks When Range Or Criteria Is Violated Option — Check the check box to require that remarks are entered in the Inspection Remarks field any time an entered reading is out of range.
-
Warn Before Permanent History Record Changed Option — Check the check box to display a warning message before changes are made to information fields in permanent history records. The warning will appear for pre-existing records in which the effective date is in the past.
-
Warn When Outside Established Range Values Enabled Option — Check the check box to display a warning message when an inspection reading is entered that is out of range.
(SysAdmin only) For property settings accompanied by a Private check box, check or uncheck the check box based on your company's requirements. When the Private check box is checked, the currently logged in user can change the associated property setting. For more information, see Understanding Public and Private Property Settings.
When you finish, click ![]() Save to save changes.
Save to save changes.