Setting Up Modbus Comm Settings
This procedure explains how to set up communication parameters for the RM3012 based on the type of input device connected to the unit.
Complete the following steps to set up the Modbus communication settings:
-
Click Change in the Modbus Comm Settings pane on the main configuration window to view the Modbus Communication Settingswindow.
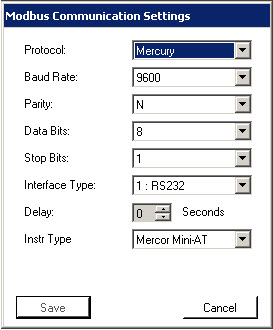
Modbus Communication Settings Window
-
Select a protocol from the list of options in the Protocol field that identifies the type of input device connected to the RM3012.
If you are working with a Dresser input device, choose Dresser I if the input device was manufactured before 2005 or Dresser II if the device was manufactured after 2005.
If needed, refer to the input device technical specifications or contact the manufacturer to determine the appropriate settings for the remaining steps in this procedure.
-
Select a Baud rate from the list of options in the Baud Rate field.
-
In the Parity field, select N (none), E (even), or O (odd).
-
In the Data Bits field, select either 7 or 8.
-
In the Stop Bits field, select either 1 or 2.
-
Verify that 1:RS232 is selected in the Interface Type field.
-
If the input device requires a handshake signal from the RM3012, use the up and down arrows in the Delay field to choose a time option. Valid selections are in a range of 0 to 10 seconds with 0 indicating an instant response.
-
If you are working with a Modbus ASCII or RTU, Mercury, or Reynolds input device, complete one of the following steps:
-
Modbus ASCII or RTU: Type the unit address assigned to the input device in the Unit Address field. Valid entries are any number from 1 to 255. To disable this feature, enter a zero (0).
-
Mercury: Select an option in the Instrument Type field that identifies the type of Mercury device connected to the RM3012.
-
Reynolds: Type the unit identification number assigned to the Reynolds input device in the Unit Id field. Valid entries are any number from 1 to 255. To disable this feature, enter a zero (0).
-
-
Click Save.