Installing the IDP Satellite Terminal to an RM4012
Complete the following steps to install an IDP satellite terminal (ST6100) to an RM4012:
-
Power off the RM4012.
-
Disconnect the existing satellite terminal connected to the RM4012.
-
Unmount the existing satellite terminal from its mounting bracket.
-
Mount the IDP ST6100 satellite terminal in the existing mounting bracket using the included screws. Ensure the bracket is set at a 90° angle, with the terminal lying flat.
-
Open the IDP ST6100 satellite terminal and record the MIN. This number should be 8-10 digits, followed by SKYxxxx. For example 01700176SKYE4CD.
-
Wire the new IDP ST6100 satellite terminal to the RM4012 using either the cable that comes with the terminal or using both the terminal's cable and the American Innovations extension cord (AI part number 626634-000):
-
If using the cable that comes with the IDP ST6100 satellite terminal:
-
Cut the cord on the opposite end of the radio and strip the colored wires.
-
Attach the wires to corresponding colors to a pin connector (red to red; white to orange; green to brown; black to black).

Wiring ST6100 With Stock Cable
-
-
If using both the stock IDP cable and the AI extension cord:
-
Attach the IDP stock cable, and then attach the stock cable to the AI extension cable. Wrap the mating point of the two cables with electrical tape to prevent moisture ingress.
-
Cut the extension cable on the opposite end of the radio.
-
Attach the wires to corresponding colors to a pin connector (red to red; white to white; green to green, black to black).

Wiring ST6100 Satellite Terminal Using AI Extension Cable and Stock IPD Cable
-
-
-
Attach the IDP ST6100 satellite terminal to the RM4012.
-
In your browser, go to simswap.bullhornsys.com. You will need to log in using your Bullhorn Web account credentials.
-
Search for the RM4012 unit serial number and select your unit from the drop-down list.
-
Enter the MIN of the new IDP ST6100 terminal that you recorded earlier in the New Radio field.

Sim Swap for New IDP ST6100 Satellite Terminal
-
Leave the Mobile No field blank.
-
Click Swap. A processing message displays.

Processing Message Window
-
Click the Report tab to open the Report window.

Report Window
-
Select your Client ID and a Start Date from the respective fields.
-
Click Run Report.
-
Click Run Report again until Swap Status for the unit changes to Completed. This may take up to 30 seconds.
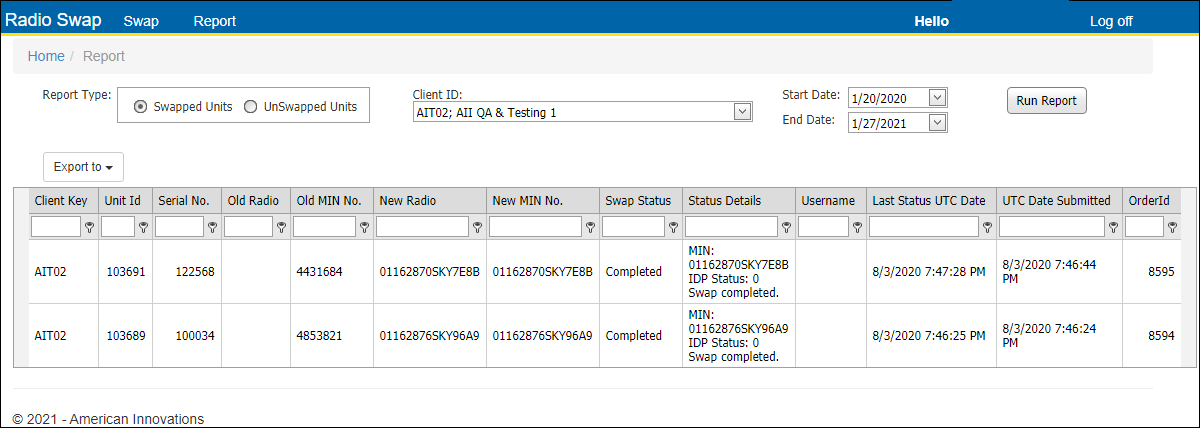
Report Window
-
In your browser, go to Bullhorn Web, find the unit, and verify the MIN/ESN has been updated to the new MIN/ESN.

Original vs Updated MIN and ESN in Bullhorn Web
-
Power on the RM4012.
-
Connect the RM4012 to your laptop and open the UCT (Universal Configuration Tool). An expected error will pop-up stating that the radio ISN doesn’t match the unit.
-
Send a test packet using UCT.
-
In Bullhorn Web, verify that the test packet arrived. This completes the IDP terminal swap.
If you have trouble getting a test packet to call in after a swap, power cycle the unit and check your Bullhorn Web account. If no packet arrives after an hour, you may need to call AI Support.