User Contact Information Tab
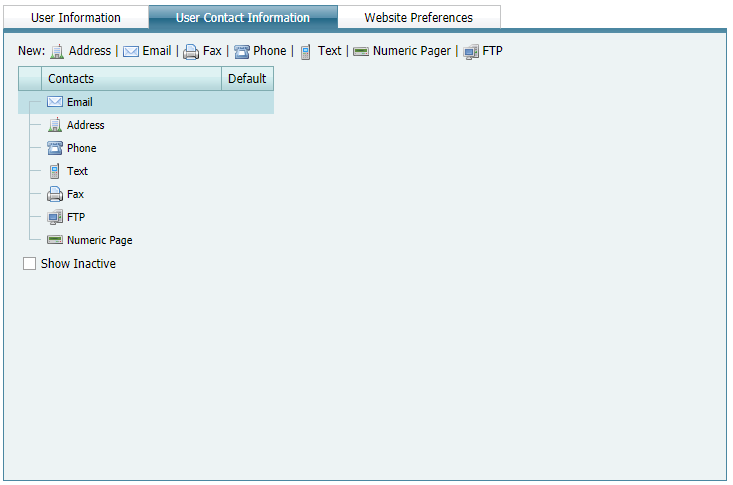
The User Contact Information tab on the My Profile page includes your contact information. User contact information functions similar to a private address book and is visible only to the user who created it. Whereas, client contact information from the Client Profile Page functions similar to a public address book and is visible to all system users. User contact information is available for selection when adding contacts to Alerts, and is shown in the format Name (User Name) >> contact name.
Complete the following steps to add or edit user contact information:
-
On the User Contact Information tab of the My Profile page, create a new contact method for yourself by clicking one of the contact types shown at the top: Address, Email, Fax, Phone, Text, Numeric Pager, or FTP.

User Contact Information Tab
-
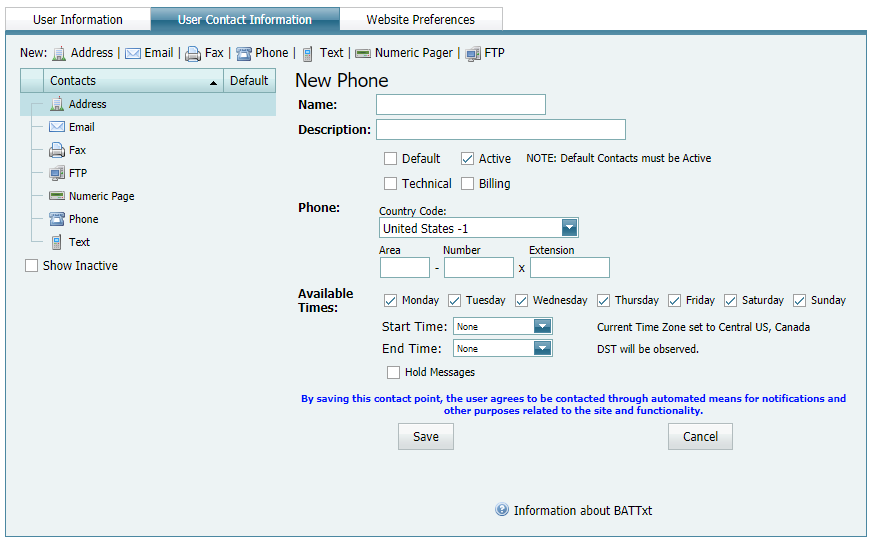
Type a name and description for the new contact method in the Name and Description fields, respectively. A new address is shown in the example.

Adding a New Address
-
The Active check box is automatically checked when a new contact method is created. To make a contact inactive, uncheck the check box.
-
Check the Default check box if you want to designate the new contact method as the preferred method for contacting you with unit information, such as unit status, alerts, or upcoming system maintenance schedules.
-
Enter the relevant information for the contact type:
-
For Address — enter Country, address in Line 1, Line 2, and Line 3 (as needed), City, State/Region, and Zip/Postal Code.
-
For Email — enter the email address where you want messages to be delivered.
-
For Fax — select Country Code; enter area code, phone number, and extension (if applicable).
-
For Phone — select Country Code, area code, phone number, and extension (if applicable).
-
For Text — enter a 10-digit number (such as a cell phone number), plus the @ symbol and your cell phone service provider's email address. Refer to Mobile Phone Carriers' Email Addresses of mobile phone providers' email addresses if you do not know the email address.
-
For Pager — select Country Code; enter area code, phone number, and extension (if applicable); enter a number for First Pause Seconds, PIN Number, and After Pin Pause; enter a Separator.
-
For FTP — enter FTP Destination address, User ID, and Password for the FTP site you are using.
-
-
For all contact types except Address, set up an Available Times schedule that identifies the day(s) of the week and hours you want to be contacted, such as Monday from 8 am to 5 pm. Select one or more days of the week and then click the down arrow in the Start Time and End Time fields to select a time schedule.

Available Times for Contacting by Email, Fax, Phone, Text, Numeric Pager, and FTP
-
For all contact methods except Address, click Hold Messages if you want to store messages in a queue and then have them sent during your Available Times schedule.
-
Complete any remaining fields, making sure to provide information for required fields highlighted in red.
-
Click Save to save changes. To cancel changes, click Cancel before clicking Save.
-
Repeat this procedure to add another new contact method as needed.
-
To edit a contact, click on the name of the contact listed under Contacts and edit any fields. Click Save to save changes.
When Start Time and End Time span two days, such as 11pm to 7am, Start Time begins with the day you select and End Time is the next day, even when the next day is not included in the schedule. For example, if Available Times is set up as Monday from 11pm to 7am, Start Time is Monday at 11 pm, and End Time is Tuesday at 7am.