Add Contacts to an Alert
Complete the following steps to add contacts or contact group to an alert:
-
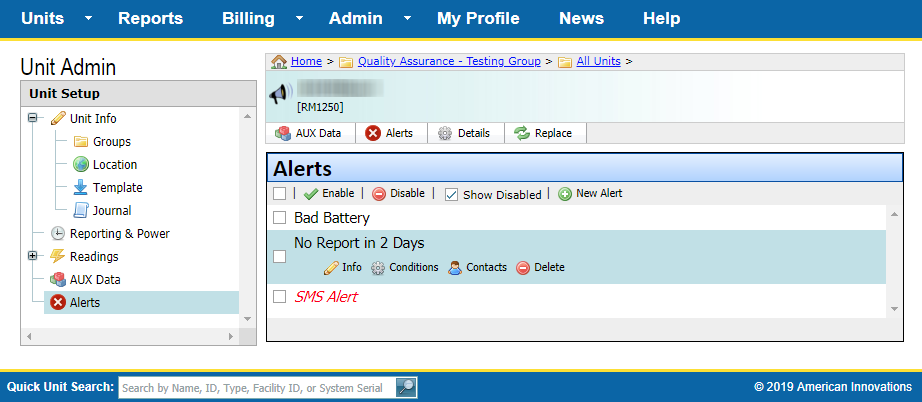
From the Alerts pane, select an alert and then click the
 Alert Contacts link.
Click the Show Disabled check box to see any disabled alerts.

All Alerts
-
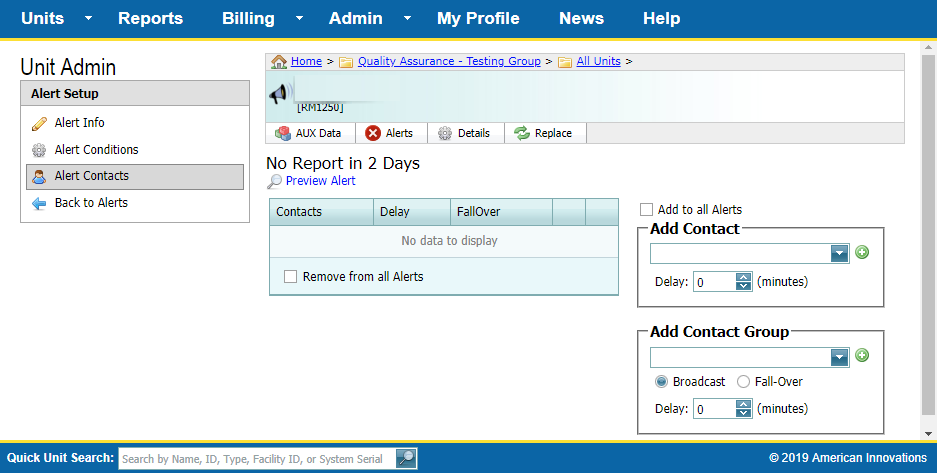
Check the Add to All Alerts check box if you want to add contacts and contact groups to all alerts (not just the current one) for the selected unit.

Add to all Alerts for Contact and Contact Groups
-
If you want the system to send a notification to a user:
-
Select a user from the Add Contact field. (See below for related information.)
-
If you want the system to wait before sending a notification, adjust the Delay time (in minutes) using the up and down arrows.
-
Click
 . The user name is displayed in the Contacts table, where you can also edit (
 ) delay time for this contact or delete (
 ) this contact. Also, if you selected Fall-Over, a
  displays next to the contact.
Delay time is the number of minutes the system waits to send a notification to a contact when an alarm condition still exists after sending a previous notification to a contact or contact group.
-
-
If you want the system to send a notification to a group of users:
-
Click the arrow in the Add Contact Group field and select a contact group.
-
Click Broadcast if you want the system to send notifications to all users in the contact group at the same time. (See below for related information.)
-
Click Fall-Over if you want the system to send notifications to a contact group one user at a time. See Note 3 for related information.
-
If you want the system to wait before sending a notification, adjust the Delay time using the up and down arrows. (See below for related information.)
-
Click
 . The contact group name is displayed in the Contacts table, where you can also edit (
 ) delay time for this contact or delete (
 ) this contact. Also, if you selected Fall-Over, a
  displays next to the contact.
-
-
To remove the contact from all alerts, check the Remove from all Alerts check box.
Note 1: Alert and Notification characteristics based on a unit's service status: If a unit's Service Status is set up as Inactive on the Info tab of Unit Admin, the system does not process alerts. A unit's service status must be set up as Installed (Notifications ON) in order for the system to send a notification to one or more contacts.
Note 2: Broadcast and Fall-Over characteristics when using Delay time: When using Delay time with the Broadcast option, the system waits the specified delay time and then sends the notification to the entire contact group. With the Fall-Over option, the system sends a notification to the contact group one user at a time; waiting the specified delay time between one notification and the next.
Note 3: Fall-Over characteristics when a notification is acknowledged: The system automatically enables the Acknowledge check box when an alert is set up with the Fall-Over option. When a user in the Fall-Over contact group acknowledges a notification, the system stops sending notifications to other users in the contact group.