Add a Custom Report
The following procedure explains how to add a custom report and set up report options. For information about deleting a custom report or changing a custom report from Public to Private or Private to Public, refer to the instructions in Themes.
Complete the following steps with one or more pipeline segments chosen in the Select ROWs window:
-
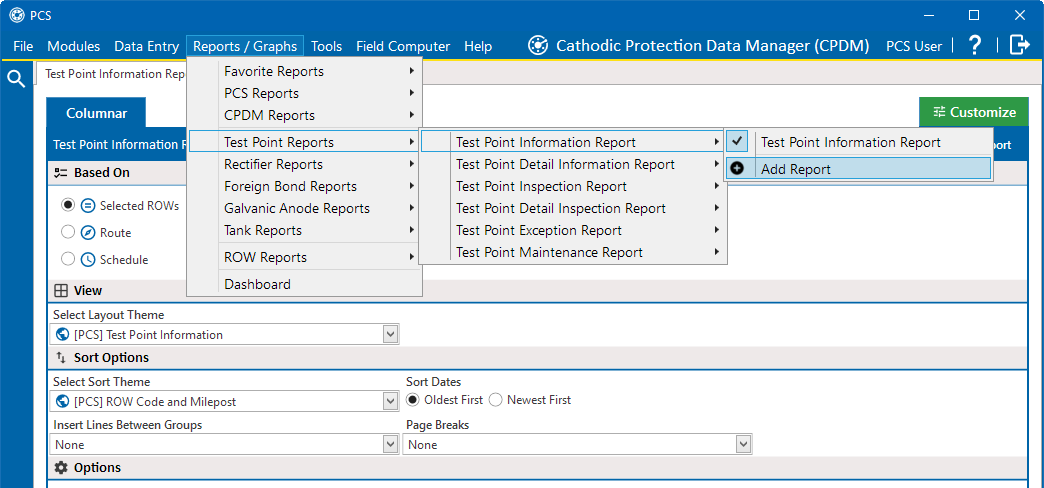
Click Reports/Graphs, navigate to a report in the list, then click
 Add Report.
Add Report Menu Item
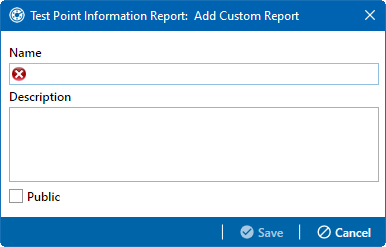
For example, click Reports/Graphs > Test Point Reports >Test Point Inspection Report > Add Report to open the Add Custom Report window.

Add Custom Report
-
Type a name for the report in the Name field. This field is required.
-
If you want to add information about the report, type the information in the Description field.
-
Select the Public check box if you want the report available to all PCS users. When a report is not public, it is a private report that is only available to the user who created it.
-
Click
 Save.
Save. -
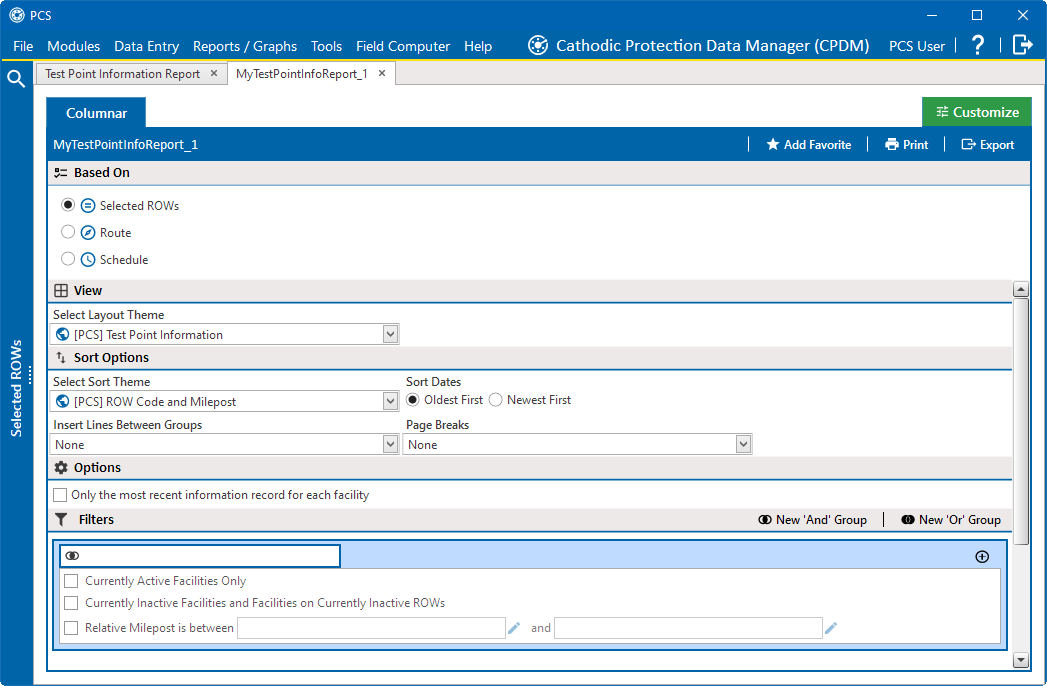
When the report options window opens, select one of the following options to choose which facility records to include in the report:

Custom Report Options
-
Click the Selected ROWs option to include facilities associated with the pipeline selection(s) in the Select ROWs window.
-
Click the Route option and then select a route to include facilities associated with the selected route.
-
Click the Schedule option and then select a schedule definition and start and end dates.
-
-
Select a layout theme from the Select Layout Theme drop-down list. The layout theme determines which fields are included in the report.
For information about adding new report themes, such as a report layout theme, sorting theme, and filter theme, refer to Report Themes and Filter Groups.
-
Complete the following steps in the Sort Options pane:
-
Select a sorting theme from the Select Sort Theme drop-down list. The sorting theme determines how PCS sorts report data.
-
Select a method for sorting inspection dates. Click either the Oldest First or Newest First radio button under Sort Dates to sort records with the oldest or newest inspection dates first.
-
Select an option for inserting a line between different groups of report data from the Insert Lines Between Groups drop-down list.
-
Select an option that determines where a page break occurs in the report from the Page Breaks drop-down list.
-
-
Select one or more of the following options as needed in the Options pane. Date range in filter criteria is determined by considering all time frame filters, such as inspection date, survey, and periodic survey filters.
-
Only show facilities with inspections— when time frame filters are not selected in the Filters pane, such as inspection date, survey, or periodic survey filters, the report includes all inspections using the inspection date and time as the reporting time period.
If one or more time frame filters are selected in the Filters group box, the report only includes inspections for the selected time frame filter(s).
-
All inspections that meet the filter criteria— report includes all inspections that meet filter criteria based on selections in the Filters group box.
-
Apply other filters to the most recent inspection found within report timeframe— this option finds the latest inspection within the reporting time frame first, and then applies all other filters selected in the Filters group box. The report only includes inspections for facilities when the latest record within the date range meets other filters.
-
The most recent inspection after the filter criteria has been met — this option applies all filter criteria first based on selections in the Filters group box, and then finds the latest inspection.
-
Indicate missing inspection readings — this option includes an empty box in the report for each missing inspection reading.
-
-
Select optional filters in the Filters pane as required. For example, click Currently Active Facilities Only to include only currently active facilities in the report.
When adding a date filter, such as Inspection Date is between, set a date range using a calendar or dynamic dates in the following manner:
-
To set a date range using a calendar, click the down arrow in the start date field to open a calendar and select a date. Repeat this step for the end date field.
-
To set a date range using dynamic start and end dates, click the
 calculator button in the start date field and set up dynamic date properties. Repeat this step for the end date field. Clicking the calculator button opens and closes dynamic date property fields.
-
-
If you want to add the report to the Favorite Reports sub-menu of the Reports/Graphs main menu, click
 Add Favorite. The link then changes to
  Remove Favorite.
If you want to remove a favorite report listed in the Favorite Reports sub-menu of the Reports/Graphs main menu, open the report and click
 Remove Favorite.
 -
To print the report, click
 Print to open the report in a preview window.
-
To print the report using the default printer set up in Windows, click the
 Quick Print button. To select a printer other than the default printer, click the
  Print button.
-